2. SWICHT
2.1. Turn on LED when you’re push the button
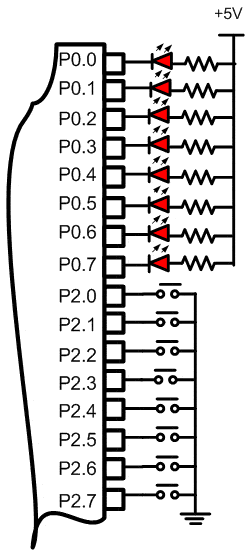
A simple way, how to demonstrate input data is by using swicht push button, of course this swicht is mechanically operated. When you are pushing the swicht then the port will get a low logic and high logic in vice reversa.

Figure 2.1. Diagram Skematik Input Data
Step 2nd
In this step, you must tipe the assembly program to make your LED on when you push the swicht, we assume that you have already known the editor, we used MIDE-51 to edit the program.
#include <AT89X52.h>
main()

while(1)

P0=P2;
Step 3rd
Safe your C program above, and name it with sw.c (for example) Compile the program that you have been save by using KEIL C, see the software instruction.
Step 4th
Download your hex file into the microcontroller by using Microcontroller PROG ISP 16.8 software, see the instruction.After download this hex file you’ll see the action of the LED ( of course if your cable connection and your program are corrected ).
2.2. Using sw pushbutton to control LED shift
#include<AT89X52.h>
main()

while(1)

if (P2_0==0)

P0_0=0;

else if (P2_7==0)

P0_7=0;

else

P0=0xff;
2.3. Setting UP/DN/Enter output LED Display
#include<AT89X52.h>
void delay()

unsigned int x;
for(x=0;x<20000;x++);

main()

unsigned char setting;
while(1)

if (P2_0==0)

setting++;
P0=~setting;
delay();

if (P2_7==0)

setting--;
P0=~setting;
delay();