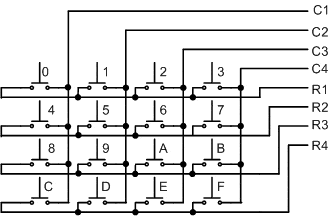
Keypads are often used as a primary input device for embedded microcontrollers. The keypads actually consist of a number of switches, connected in a row/column arrangement as shown in Fig 2.8.1.
In order for the microcontroller to scan the keypad, it outputs a nibble to force one (only one) of the columns low and then reads the rows to see if any buttons in that column have been pressed. The rows are pulled up by the internal weak pull-ups in the 8051 ports. Consequently, as long as no buttons are pressed, the microcontroller sees a logic high on each of the pins attached to the keypad rows. The nibble driven onto the columns always contains only a single 0. The only way the microcontroller can find a 0 on any row pin is for the keypad button to be pressed that connects the column set to 0 to a row. The controller knows which column is at a 0-level and which row reads 0, allowing it to determine which key is pressed. For the keypad, the pins from left to right are: R1, R2, R3, R4, C1, C2, C3, C4.

Figure 2.8.1. Keypad 4 X 4 Connection
The Algorithm
Matrix-type keypads consist of a rectangular array of momentary push button. Each row and each column of push buttons is connected to a common rail. Suppose a four by four array of push button are used. A four by four array is often used to input hexadecimal numbers. There are four comun rails and four row rails. Each pushbutton has two terminals, one connected to its column rail and the other to its row rail. The row and column rails are connected to the microcontroller ports. The columns are driven low by output port. The rows are then read into the input ports. If no key is pressed, the rows read 1. When a row is detected to be 0, it indicates that a key in that row is pressed. the task now is to detect which key of the row is actually pressed. The microcontroller loops through each column, driving only one column low at a time as it inspects the row.The microcontroller needs to poll the rows to see if a key is pressed. Only when the column in which the pressed key resides is driven low is the row rail grounded, and thus the voltage is low. The rows and columns are interchangeable, that is, the rows may be driven low as the columns are read by the input ports.
8.1. Display Keypad Data to LED
In this lesson we are like to design, how to scan keypad 4 x 4, and then display it to LED.
Figure 2.8.2. Keypad connection and display to LED
Step 1st
Build the circuit as shown in figure 2.8.2. As you seen on figure 2.2.8. P3.0 trough P3.7 is connected to keypad 4 x 4 and to drive LEDs, it’s connected to P2.0 trough P2.7.
Step 2nd
In this step, you must tipe the assembly program to scan your keypad data, we assume that you have already known the editor, we used MIDE-51 to edit the program. ( Download File : exp281.zip ,Download Complete Circuit File : Keypad4x4.pdf )
;In this lesson we'll scan keypad and get data out to LED
;and convert it into binary data
row1 bit P2.4
row2 bit P2.5
row3 bit P2.6
row4 bit P2.7
col1 bit P2.0
col2 bit P2.1
col3 bit P2.2
col4 bit P2.3

keydata   equ 70h
keybounc  equ 71h
keyport   equ P2
org 0h
start: call keypad4x4    ;calling subroutine keypad4x4
Mov A,keydata     ;A = keydata
Cjne A,#0FFh,send ;
sjmp start        ;LOOPING FOREVER
send:  CPL A             ;A = NOT A
Mov P0,A          ;P0 = A
Sjmp start        ;LOOPING FOREVER PART 2

delay: mov R0,#0
delay1:mov R2,#50
djnz R2,$
djnz R0,delay1
ret

;====================================
; subroutine scan keypad 4x4
;====================================
Keypad4x4:
mov keybounc,#50    ;keybounc = 50
mov keyport,#0FFh   ;keyport=P2= FF
clr col1            ;col1= P3.0 = 0
Detect:jb row1,key1        ;jump to key1 if row1=1
djnz keybounc,Detect
mov keydata,#00h    ;Keydata =00h
ret

key1: jb row2,key2         ;jump to Key2 if row2=1
djnz keybounc,key1
mov keydata,#04h     ;Keydata = 04h
ret

key2: jb row3,key3         ; idem
djnz keybounc,key2
mov keydata,#08h
ret

key3: jb row4,key4         ; idem
djnz keybounc,key3
mov keydata,#0Ch
ret

key4: setb col1
clr col2
jb row1,key5
djnz keybounc,key4
mov keydata,#01h
ret

key5: jb row2,key6
djnz keybounc,key5
mov keydata,#05h
ret

key6: jb row3,key7
djnz keybounc,key6
mov keydata,#09h
ret

key7: jb row4,key8
djnz keybounc,key7
mov keydata,#0Dh
ret

key8: setb col2
clr col3
jb row1,key9
djnz keybounc,key8
mov keydata,#02h
ret

key9: jb row2,keyA
djnz keybounc,key9
mov keydata,#06h
ret

keyA: jb row3,keyB
djnz keybounc,keyA
mov keydata,#0Ah
ret

keyB: jb row4,keyC
djnz keybounc,keyB
mov keydata,#0Eh
ret

keyC: setb col3
clr col4
jb row1,keyD
djnz keybounc,keyC
mov keydata,#03h
ret

keyD: jb row2,keyE
djnz keybounc,keyD
mov keydata,#07h
ret

keyE: jb row3,keyF
djnz keybounc,keyE
mov keydata,#0Bh
ret

keyF: jb row4,Nokey
djnz keybounc,keyF
mov keydata,#0Fh
ret
Nokey:mov keydata,#0FFh
ret
;================================
;The end of Keypad 4x4 subroutine
;================================
end
Step 3rd
Safe your assembly program above, and name it with key1.asm (for example) Compile the program that you have been save by using MIDE-51, see the software instruction.
Step 4th
Download your hex file ( key1.hex ) into the microcontroller by using Microcontroller ATMEL ISP software, see the instruction.After download this hex file you’ll see the action of Keypad 4 x 4( of course if your cable connection and your program are corrected )